

How To Mount Ubuntu Partition In Windows 10
This browser is no longer supported.
Upgrade to Microsoft Edge to accept reward of the latest features, security updates, and technical back up.
Mountain a Linux disk in WSL 2
If yous want to access a Linux disk format that isn't supported by Windows, you lot can use WSL ii to mount your disk and admission its content. This tutorial volition cover the steps to place the disk and sectionalisation to attach to WSL2, how to mountain them, and how to access them.
If you are looking for guidance on how to connect a USB device (flash drive, SD carte reader, etc), see Connect USB devices.
Note
Ambassador access is required to attach a disk to WSL 2. The WSL 2 mountain control does not back up mounting a deejay (or partitions that vest to the disk) that is currently in utilise. wsl --mount ever attaches the entire disk fifty-fifty if only a segmentation is requested. You can't mountain the Windows installation disk.
Prerequisites
Y'all will need to exist on Windows 11 Build 22000 or later to access this feature. Y'all can bring together the Windows Insiders Program to go the latest preview builds.
Mounting an unpartitioned deejay
In this simplest instance, if you have a deejay that doesn't have whatsoever partitions, y'all can mountain information technology straight using the wsl --mountain command. First you demand to place the disk.
-
Place the disk - To listing the available disks in Windows, run:
GET-CimInstance -query "SELECT * from Win32_DiskDrive"The disks paths are bachelor under the 'DeviceID' columns. Usually under the
\\.\PHYSICALDRIVE*format. -
Mount the deejay - Using PowerShell, you can mount the deejay using the Disk path discovered above, run:
wsl --mount <DiskPath>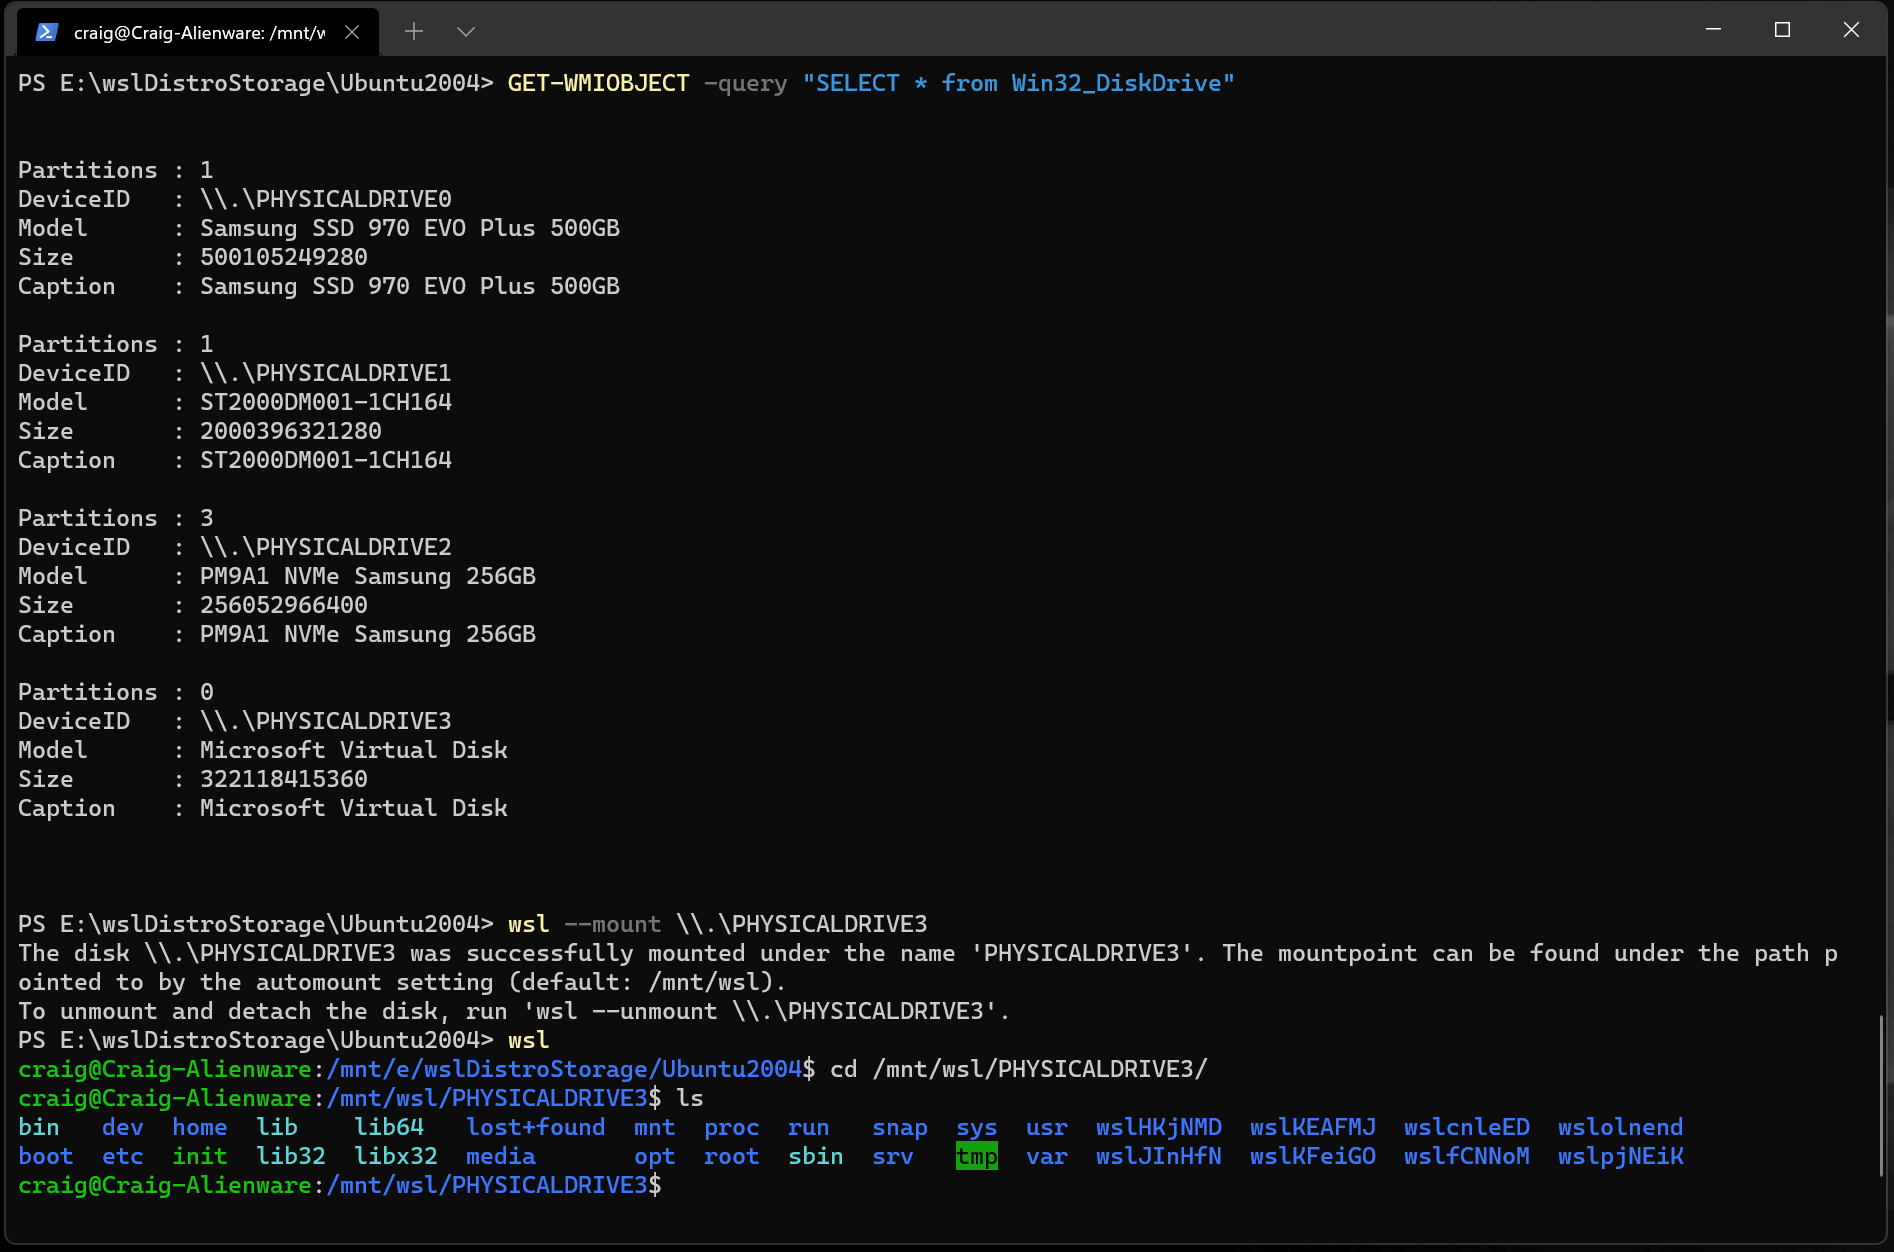
Mounting a partitioned disk
If you have a disk that you lot aren't sure what file format information technology is in, or what partitions it has, yous tin can follow the steps below to mount it.
-
Identify the disk - To list the available disks in Windows, run:
GET-CimInstance -query "SELECT * from Win32_DiskDrive"The disks paths are listed after 'DeviceID', usually in the
\\.\PHYSICALDRIVE*format. -
List and select the partitions to mount in WSL ii - One time the disk is identified, run:
wsl --mount <DiskPath> --bareThis volition brand the disk available in WSL 2. (In the case of our example, the
<DiskPath>is\\.\PHYSICALDRIVE*. -
One time attached, the partition can be listed by running the post-obit command within WSL 2:
lsblkThis will display the available block devices and their partitions.
Inside Linux, a block device is identified as /dev/<Device><Partition>. For example, /dev/sdb3, is the division number 3 of disk sdb.
Example output:
NAME MAJ:MIN RM SIZE RO TYPE MOUNTPOINT sdb viii:16 0 1G 0 disk ├─sdb2 viii:eighteen 0 50M 0 role ├─sdb3 8:19 0 873M 0 part └─sdb1 8:17 0 100M 0 part sdc eight:32 0 256G 0 disk / sda 8:0 0 256G 0 deejay Identifying the filesystem type
If you don't know the type of filesystem of a disk or partition, you can use this control:
blkid <BlockDevice> This will output the detected filesystem type (under the Blazon="<Filesystem>" format).
Mount the selected partitions
Once you have identified the partitions y'all desire to mount, run this control on each partition:
wsl --mount <DiskPath> --partition <PartitionNumber> --type <Filesystem> Annotation
If yous wish to mount the entire disk as a single volume (i.east. if the deejay isn't partitioned), --partition can exist omitted.
If omitted, the default filesystem type is "ext4".
Access the deejay content
Once mounted, the disk can be accessed nether the path pointed to past the config value: automount.root. The default value is /mnt/wsl.
From Windows, the disk can be accessed from File Explorer by navigating to: \\wsl$\\<Distro>\\<Mountpoint> (pick any Linux distribution).
Unmount the deejay
If you lot want to unmount and detach the disk from WSL 2, run:
wsl --unmount <DiskPath> Mount a VHD in WSL
Yous can also mountain virtual hard disk files (VHD) into WSL using wsl --mount. To do this, yous first need to mount the VHD into Windows using the Mount-VHD command in Windows. Be sure to run this command with administrator privileges. Below is an case where nosotros utilize this command, and also output the disk path. Be certain to supervene upon <pathToVHD> with your bodily VHD path.
Write-Output "\\.\PhysicalDrive$((Mount-VHD -Path <pathToVHD> -PassThru | Get-Deejay).Number)" You can use the output above to obtain the disk path for this VHD and mount that into WSL following the instructions in the previous section.
You can also use this technique to mount and interact with the virtual hard disks of other WSL distros, as each WSL 2 distro is stored via a virtual hard disk file called: ext4.vhdx. By default the VHDs for WSL two distros are stored in this path: C:\Users\[user]\AppData\Local\Packages\[distro]\LocalState\[distroPackageName], please exercise caution accessing these system files, this is a power user workflow. Make sure to run wsl --shutdown before interacting with this disk to ensure the disk is not in use.

Control line reference
Mounting a specific filesystem
By default, WSL 2 will attempt to mount the device as ext4. To specify another filesystem, run:
wsl --mount <DiskPath> -t <FileSystem> For case, to mount a disk every bit fatty, run:
wsl --mountain <Diskpath> -t vfat Notation
To listing the bachelor filesystems in WSL2, run: cat /proc/filesystems
When a disk has been mounted via WSL2 (Linux file system), information technology is no longer available to mount via an ext4 driver on the Windows file arrangement.
Mounting a specific sectionalization
By default, WSL ii attempts to mount the entire disk. To mount a specific partition, run:
wsl --mountain <Diskpath> -p <PartitionIndex> This just works if the deejay is either MBR (Master Kicking Tape) or GPT (GUID Partition Table). Read about segmentation styles - MBR and GPT.
Specifying mount options
To specify mount options, run:
wsl --mountain <DiskPath> -o <MountOptions> Instance:
wsl --mount <DiskPath> -o "data=ordered" Annotation
Just filesystem specific options are supported at this fourth dimension. Generic options such as ro, rw, noatime, ... are not supported.
Attaching the disk without mounting it
If the disk scheme isn't supported by any of the above options, you tin can attach the disk to WSL ii without mounting it by running:
wsl --mountain <DiskPath> --bare This volition make the block device available inside WSL two so it tin can be mounted manually from there. Use lsblk to listing the available block devices inside WSL two.
Specifying the mount name
By default the mountpoint name is generated based on the physical disk or VHD proper noun. This tin be overriden with --proper noun. Example:
wsl --mount <DiskPath> --name myDisk Detaching a disk
To detach a disk from WSL 2, run:
wsl --unmount [DiskPath] If Diskpath is omitted, all attached disks are unmounted and detached.
Notation
If 1 disk fails to unmount, WSL two can be forced to exit past running wsl --shutdown, which will detach the disk.
Limitations
-
At this time, only entire disks can be attached to WSL 2, pregnant that information technology'south non possible to attach only a segmentation. Concretely, this means that it's not possible to apply
wsl --mountto read a partition on the boot device, considering that device can't be detached from Windows. -
Only filesystems that are natively supported in the kernel can be mounted by
wsl --mountain. This ways that it's non possible to use installed filesystem drivers (such every bit ntfs-3g for example) by callingwsl --mount. -
Filesystems not direct supported by the kernel can be mounted via a
--blankattach and then invoking the relevant FUSE driver.
Feedback
Submit and view feedback for
Source: https://docs.microsoft.com/en-us/windows/wsl/wsl2-mount-disk
Posted by: tolartherect.blogspot.com
0 Response to "How To Mount Ubuntu Partition In Windows 10"
Post a Comment